How to sew Jeans.
Also on Jaycotts blog How to sew jeans
This is perhaps the most daunting yet the most satisfying garment you can ever master. Jeans are personal and we all have differing views of what the perfect pair should look like.
Get them right and I guarantee that you will love them so much that you will never buy another pair again. I know I won't
Recently I have been creating this years summer wardrobe. Starting with pants and jeans.
I really love these jeans. My favourite pattern is THE GINGER JEANS by Closet Case
A tip for you. If you have a pattern which you use a lot it is really worthwhile ironing all the pattern pieces onto some cheap interfacing to prolong its life

I made a new pair in a dark blue stretch denim . I make the high waisted version.

I like to use a lovely lining - that's for my benefit

I made another pair in cream stretch denim with a beautifully coordinated lining.

And look at the pockets on the back. How cute.
So, let's get started


This is not a quick project and you have homework to do before we even consider looking at patterns!
First of all, what is your preferred style? I love a high waist, narrow leg Jean which is very well fitted. If that is not your style there is straight leg, flared leg, boot cut, ankle length. And then there are jeans which fit below your waist or on your waist.
The first thing you need to do therefore is to figure out which style you prefer. You may already own a pair which you love and which fit you well. This is good news because you can use them to refer to when making your own. If not then go along to a clothes store and try on as many pairs as you can and take selfies of those you like. Make a note of the style and if you dare, measure at least the hips and waist.
The first thing you need to do therefore is to figure out which style you prefer. You may already own a pair which you love and which fit you well. This is good news because you can use them to refer to when making your own. If not then go along to a clothes store and try on as many pairs as you can and take selfies of those you like. Make a note of the style and if you dare, measure at least the hips and waist.
For your next task take a look at jeans in general and make a note of different top-stitching ideas and ideas for pockets. You can customise your jeans in so many ways so do take time to look for ideas. Pinterest is great for ideas.


The first part of the pattern to look at - and you can do this on Jaycotts web site before you order - is the size chart.
Ignore your shop bought size and go by your actual measurements, the sizing is very different in each.
We are going to be sewing with a stretch denim which has " negative ease" ( more about that later ) so if you are between sizes it is likely you will require the smaller size.

Another choice would be this pattern, which again is easy and has alternative style choices .M7547 Jeans and overall
There are other jeans patterns of course including by indi designers but these two are great for people new to sewing jeans. I have made both of these patterns and love them both. I also love Closet Case Ginger Jeans which is great for people who are experienced jeans sewers, and this is the pattern I chose for my denim pair.

You need to purchase your Denim. A good quality jeans weight denim is not cheap. You need one which has 2% Elastane or Lycra. This fabric will have a four way stretch and will mould to your body. Do not choose a denim without stretch as sewing it and fitting it is totally different.
You need some fabric to practice on and make wearable toiles with. For this look for a twill, cotton sateen or suiting as I have done but whatever you choose it must be substantial and it must have at least 2% Elastane or Lycra, and stretch with the grain as well as across it. IE it too must have four way stretch. I recommend these denims which are superb quality Lady McElroy Denims
The very first thing you MUST do is put the whole lot in the washing machine. The fabric shrinks and we need it to do that now rather than after we have made our lovely jeans.
Don't use fabric conditioner ever on jeans, half a cup of white vinegar instead of fabric conditioner will help preserve the colour and I promise you it does not smell like a chip shop!
Let your fabric dry naturally and then press it on the wrong side.
All this work and we have not even started yet!

I purchased two lengths of stretch suiting to make two test garments with.
For this first version ( which I wear a lot ) I didn't do the fly front. Instead I stitched down the centre front seam and inserted a zip in the side seam.
Doing this enables me to test the fit and I still get a nice pair of pants to wear.
I found that the fit was good, I just needed to take them in slightly at the side seam.
When you make your test garment it is a very good idea to wear it for a day and make note of how it feels. Can you sit down in it comfortably? When you stand up do you have to pull the legs down? Is the waistband comfortable? Do they feel too big, too small? All these adjustments should be noted down and your pattern adjusted.
My next test garment will be to practice the techniques needed to make the actual denim pair for example the fly front, rivets and so on.
If you think this a waste of time and money at least make one test pair ( toile) the denim fabric is too nice and expensive to risk. Besides you are still getting some lovely pants to wear, nothing is wasted.

I experimented with back pockets and tried various designs including this one. If you plan a design on both pockets don't forget to mirror the design on each.
Another idea was to embroider a design - I am sure you can come up with your own ideas.
In the end however I decided that a plain back suited me better so I removed the pockets altogether. Positioning of back pockets is very important as it draws the eye, so take care to position them in a flattering position - higher rather than lower - and use safety pins please, not straight pins, when finding the perfect position.
Another bit of advice. You will be referring to your pattern instructions constantly and following every step carefully, so pin them on the wall, the curtains, wherever you can see them easily. You do not want to be hunting for them at every step!

Supplies
In addition to your denim and a pattern you will need the following, all available from Jaycotts. I will list each product with the direct link next to it.
- Jeans thread. This is an extra strong thread for sewing denim, lots of colours to choose from. Choose the closest one to your fabric Extra strong thread
- Top stitching thread. Match with or contrast with your fabric. Top stitching thread
- Denim machine needles Denim machine needles
- Top stitching needles Top stitching needles
- Jeans Zip. (I had both 6" and 7" and found the 6" perfect ) Jeans zip
- Jeans buttons Jeans button
- Jeans rivets Jeans rivets
- Vario plyers for attaching jeans buttons and rivets Vario plyers
- Jean-a-ma-jig - great for sewing over bulky seams Jean a ma jig
Finally you will need half a metre of a substantial woven cotton for lining, pocket, facing etc.

If you are fortunate enough to own another sewing machine you will find it invaluable when sewing anything requiring top stitching . I have a basic sewing machine as well as my main machine which is the Brother innov-is 1300 so I threaded it up with my top stitching thread purely for speed.
Sewing machines have lots of different functions and a huge price range so I urge you to take advice from the experts and telephone or visit Jaycotts ( contact details at the end of the post) to discuss your needs and price bracket. If you plan on visiting them at their Chester showroom then you will be invited to try a few before making your mind up.
As I was saying I used my basic machine purely for top stitching, my normal machine for all the sewing and my overlocker to finish the seams.
If you are like most people and have one sewing machine then it is simply a question of changing needle and thread before top stitching. No overlocker? A zig-zag stitch will do just fine.

I decided to make another pair in a navy blue stretch suiting this time to practice the pockets, fly front and placing rivets.
I was quite happy to do this because I have ended up with a very nice pair of trousers.
If you don't want to be bothered with all these test garments then skip the previous pair and start with making these so that you can practice techniques and get the fit right at the same time.
I have been testing various patterns and actually made several pairs, some I didn't finish, because I really wanted to find the best patterns for you to make, the patterns which had the best instructions and were not too difficult to sew.

There are various options for finishing the waistband and they are all down to personal taste.
If you want a waistband which stretches and moves with you ( and it will do despite the top stitching) then cut out the waistband and facing in denim with no interfacing.
For a waistband with a bit of give cut out the waistband in denim and the facing in a strong cotton fabric - a poplin or quilting fabric is ideal, and choose a print which you love as you will see it and smile every time you put them on.
The third option if you like a firmer waistband - as I do - is to cut out the top piece in denim, and interface the cotton lining with a medium interfacing.
It really is all down to personal choice

I have stitched my waistband on and it is ready for top stitching and the button to go on.

This is my wearable toile which I must say I am extremely happy with.

Please note that I chose high waisted patterns throughout, if you choose the versions which sit below the natural waistline, and I know many of you prefer them, yours will look different to mine, and you may not even want your top to be tucked in ever! If that is the case fit them to your body under your top and test them by sitting down and standing up a few times to make sure that you are happy with the fit.
Also, if you are making a very skinny jean then expect some wrinkling around the back of your thigh during wesr , it's because of the snug fit - the ease has to come from somewhere!

When choosing your top stitch thread you have lots and lots of choice. If you are nervous about your stitches looking wonky then go for a thread to match your fabric, but if you are feeling braver (and why not) go for one of the many colour choices available. Practice a little until you get the stitch length you like best and enjoy your contrast stitching.
Whatever you choose then just put an normal sewing thread in the bobbin.

This is my actual pair of denim jeans that I am working on. Take it step by step and follow each part of the pattern instructions to the letter, you could mark each stage as you go along if it makes it easier to remember where you are up to.
Keep trying on at every stage because your denim will behave differently to your test fabric and the most important thing is to get the fit right.
I found that I needed to take mine in quite a lot despite the test garment fitting me perfectly.

My Ginger jeans have a fabric stay which covers the entire front of the jeans, the Butterick pattern has pocket bags cut out in the cotton fabric. I love both patterns,
I just don't want you worrying if yours don't look exactly like this, because it depends on which pattern you use.

The fly opening is less complicated on the Butterick pattern but whatever you do don't be daunted by it.
I know it seems scary but once you start doing it and taking it step by step, following the instructions to the letter it will all make sense.
If you are nervous then practice a few times on your test garment first. You could even cut out the fly part and a bit of the front in some spare fabric and copy a pair of trousers you already own. Once it "clicks" how to insert the zip it will be plain sailing, but like everything else it takes practice. Just don't give up! Tack everything first and only machine sew once you are happy with the result.

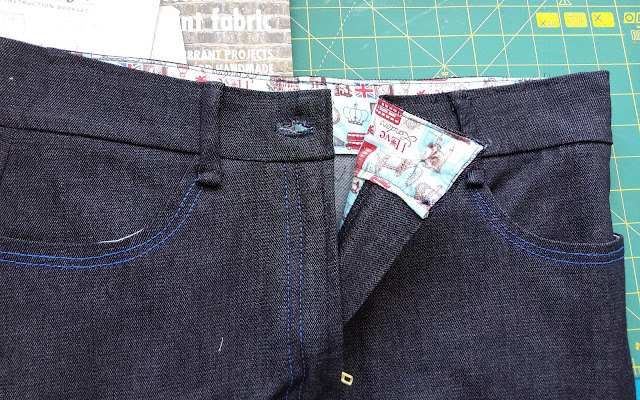
On this picture I have tacked ( basted) the centre front opening and stitched the rest of the centre front seam , overlocking the edge. Again all the patterns vary at this point which is why I asked you to put your instructions where you can see them at ll times.
You will find that the Butterick pattern makes it far easier to insert the zip and the fly than the Ginger pattern and quite honestly there is little to distinguish between the finished garment - another good reason for staying with a pattern you know.
My only gripe with the big established pattern companies is that their sizing has not kept up with modern day figures. For example on Butterick patterns I need a size 10 for hip/ bust measurements etc, yet I am expected to have a 25" waist which I don't think I have ever had ,and is totally unrealistic for real people. The independent companies do get the hip - waist - bust ratio perfect for real women. This sizing issue is one reason why many people struggle to choose their correct pattern size - it is very confusing! Unless the your pattern size is right we have no chance in producing a fit which we are happy with.
I speak to a lot of sewing newbies and this is a real issue.
The only thing I can say is to measure yourself correctly, ignore the pattern size and choose the bust measurements for a dress or top, and the nearest hip measurement if making pants or skirt, and add larger seam allowances from the hip to the top of the waist. For me increasing just the side seams from the usual 5/8" to 1" gives me plenty of room for taking in or letting out, and that is what I do, adjusting to fit when I do my first fitting.
But I agree, it is time all sizing was brought up to date.

At the bottom of my fly opening I used the buttonhole foot to make bar tacks to hold the fly and the fly facing together. You could easily do this by hand if you prefer.
By the way it helps enormously if you use french chalk to draw your top stitching lines before sewing them

On skinny jeans patterns especially you may notice the difference in width between the front and the back leg. Don't worry, this is perfectly normal, the larger back is to accommodate your calf and thigh and helps the seams to sit down the centre of your side leg.
Similarly the back leg of skinny jeans is usually slightly shorter than the front leg, this extra length needs to be eased in between the knee and the crotch. This allows you some wriggle room when wearing them!


There is one little inexpensive gadget - the link is above - which is so very useful for sewing bulky seams with ease. Use it where seams cross each other and see how easy it makes it. Saves on broken needles too.

I talked about waistbands before . I always cut mine a couple of inches longer to give room for any adjustments.
On the facing I stitch 5/8" from the edge and this gives me a fold line which I turn under and press. Try on and adjust the fit as necessary.

Then I stitched the right side of the waistband in place, matching all notches and pressed.
My zipper was too long so at this stage I used plyers to remove the metal teeth from above the seam line.
Press the seam and fold the waistband right sides together and stitch the centre fronts level with the fly fronts and stitch. Remove excess fabric and trim the corners, turn right sides out and press.
Press the waistband flat and tack together. The facing should be level with or just below the seam.
Adjust the waistband until you are perfectly happy with it and then top stitch all the way around top, bottom and fronts. Start at the centre back where the back stitches will be hidden by the belt carrier. Make sure that you catch the facing down

Stitch the buttonhole then use FRAY check to stop the fabric from fraying before carefully cutting the buttonhole with pointed scissors.
Mark the position of the button and use an awl to make a hole for the back part of the button. Then attach the button back using your plyers.
Do the same with your rivets. They usually go on the outside of pockets etc, but please be as creative as you like!

When I pinned up the hem I left the length long enough to accommodate different heel heights and besides I hate it when trousers are just that bit too short and I am forever pulling the leg down when I stand. I want a pair of jeans that I can put on and forget about.
When you have finished sewing your beautiful jeans you will need to discard all of your sewing machine needles - including your overlocker needles as they will most certainly be blunt. (I do this every time I finish a garment so that I don't forget. Needles have a short life span)

I wore my jeans all day today as I wore them to visit my son. I had a two hour train journey there and back, shopping, a look round an art gallery, copious coffee breaks and a large lunch.
They were extremely comfortable all day, the waistband remained crease free even at the end of the day,and they felt great. My top stayed tucked firmly in place and best of all my son said " nice jeans, where did you get them from?"
One minor niggle - and it is minor - was a small crease just beneath the waistband at the back.

So to get rid of this when I make my next pair I need to shorten the back by a mere half inch. I have a slightly hollow back and that is what caused the crease. All I need to do is to just gently snip a curve of fabric from the back as shown above, this will cause the fabric to hug my back more. Problem solved!

When I make my next pair they will be more dressy than casual and I will make them even narrower from the hip and all the way down the leg. I can't wait to get started, in fact I just ordered more fabric......
I have spent an entire month researching and trying different patterns and fabrics for this post. Some of the patterns looked better on than others, some denims were better than others. I do feel that jeans need to be made from the best quality fabric that you can afford and that the very best results are achieved only by making test garments first. I am aware that a lot of new sewers skip this step and do not realise the value in doing it, but it really is important to test the fit of your garment and to practice any new processes before you cut into your main fabric. It is also important to wear your test garments at least for a day to make sure you are happy with everything. This is not a waste of time I promise you. You are after all making more additions to your wardrobe!
I am more than happy for you to print this post to keep and use.

I have since made another pair in cream and I am currently making a black pair too - I really do love my bespoke jeans far better then any I have ever bought.

I made a pair in cream denim and lined them with a green patterned cotton. This fabric is from Jaycotts by the way, yes that's right, they are now selling fabrics. You cannot purchase fabric online as yet, it is ONLY available in store. But what a fabulous excuse for a short break in Chester.

I know that nobody else but me can see the coloured lining, but it makes me smile every time I wear them and that is all that matters. It is little touches like this which make any garment special.

I am still using three machines, this time I have my Bernina running. It's a fabulous machine, the stitches are immaculate.
I have a blog post all about it here The Bernina 350 PE edition
My blog about the Brother Innov-is 1300 is here My Brother innov-is 1300
And the overlocker blog post is My overlocker
Of course a different machine may suit your needs better so do speak to Jaycotts about the best machine for you

The pair of jeans I am currently making is in Black denim with a pink floral lining and pink topstitching.


I hope that I have given you some ideas on how to personalise your jeans.
To visit Jaycotts follow the directions on this link. Visit Jaycotts Do check opening times before setting off though .
For all enquiries telephone them on 01244 394099 They will be more than happy to help you with your enquiries and to take your order.
For sewing queries or for comments on my blog post please either message me through Jaycotts or complete the contact form on my blog SewAngelicThreads but please leave your email address in the body of your message to enable me to reply to you. I received a lovely message recently but I was unable to respond to it very sadly
Finally we would all love to see photographs of your jeans!
Best wishes
Angela - SewAngelicThreads
A lot of places sell good quality Denim. MinervaCrafts have a great selection of denim in weights suitable for all sorts of projects including jeans.
To view the Denim collection go to this link : Denim Fabrics
If you join the Swatch Club Minerva Swatch club
or Craft club Minerva Craft club
you will get discount on your purchases too.
