This is a Jaycotts.co.uk blog post.
Kwik Sew 4250 Jacket, top and pants. A blog post for total beginners or those returning to sewing after a break.
This is the three piece loungewear outfit and isn't it fabulous!

I thought long and hard over this blog post.
The first thing I considered was how much detailed instructions to give, and how much opportunity should I allow for you to follow the actual pattern instructions. It is vital that we are able to read a pattern but I appreciate that they don't always make sense. I hope that I achieved a balance which is right for you.
The pattern I used is this one Kwik Sew pattern K4250
I love Kwik Sew patterns - view the range here Kwik Sew Patterns at Jaycotts
They are good for all levels, have a good design range and are printed on better quality tissue paper than most.

This is the range of fabrics which I used to make each garment featured in the pattern. These fabrics are a very good quality quilting weight cotton from - believe it or not - Jaycotts! They are only available in store at the moment. You cannot buy them online.
You will however easily find good quality pure cotton in most fabric shops. Do choose a medium weight or quilting weight cotton as it will make sewing your garments so much easier.
Mix and match colours however you like, sewing is all about making something which you enjoy wearing.
By the way these particular fabrics are quite narrow, Dress fabrics tend to be wider.
If I could make another suggestion as to fabric comfortable for lounge wear, I would choose a Cotton Lawn it is easy to work with and comes in at all sorts of prices .do take a look.
Fashion is very personal. I showed the pattern we will be using to some friends and asked them where they would wear it, some said lounge wear, some said beach, some said everyday wear, all depending on the fabric chosen.
I have worn my garments in different ways and matched them with other garments and I wanted to leave it to you to decide where and when you are going to wear your lovely new garments without influencing you.

We are going to start by making the jacket. The pants and top will follow in another blog post. I didn't want to put you off by doing too much all in one go!
In the next post I will show you how I styled all of my garments and there will be photographs.
These are the fabrics I chose to use for the jacket. We are always told never to mix prints but never be afraid to bend the rules , these two prints actually sit very well together.


Once you have decided on your size cut the pattern pieces out and have a look at them to see how many of each you need and identify any which need to go on the fold line of the fabric.
There is a pattern layout guide on the first page of the pattern instructions which I suggest you follow.

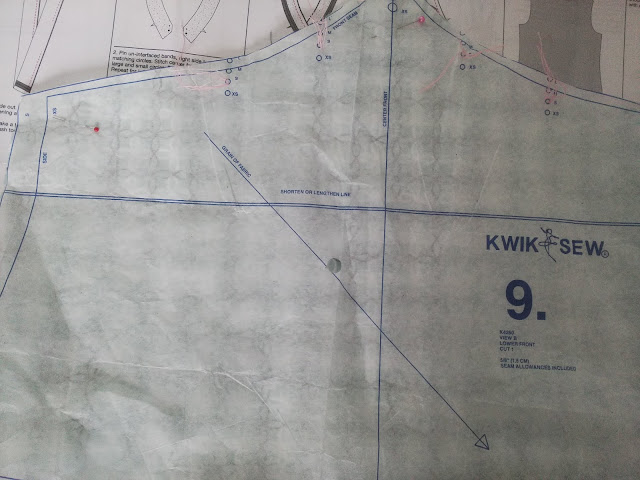
In addition to making sure that the pattern pieces are the right way up they must also be on the grain of the fabric. You will see a line with an arrow at each end printed on each pattern piece. This line needs to be exactly the same distance from the selvedge of the fabric all the way along. Use your tape measure and pin your pattern to the fabric once you know it is straight.
Don't try to save fabric by skipping this step. If your fabric is not straight the garment will not hang straight either.

A tip is to put all your tissue paper and fabric scraps into a bin until you have finished your garment - it is so easy to throw a pattern piece out by mistake and you may need a fabric scrap.

I always keep larger pieces of left over fabric for other projects. Patchwork etc.

We need some way of transferring pattern markings onto fabric. My preferred way is with tailors tacks.
You will see various dots which need to be marked onto your fabric, or there may be darts
To mark the position with tailors tacks stitch on the spot a couple of times with tacking thread leaving long loops on the top.

Then simply ease the fabric apart and cut the thread in the centre leaving tufts of thread on each piece.
There are other methods including using marker pens but this is my preferred way as the fabric is in no risk of being damaged.

There is a glossary of seams and stitches on the pattern instructions, do read them as they will be invaluable when it comes to stitching your garment together.
I am using my overlocker to finish my seams but other methods are described above.


Be careful with your iron temperature when using iron on interfacing, use a pressing cloth as it can easily melt!
Hint! Press each seam as you sew it to blend the stitches into the fabric for a professional finish

I have made up the collar , stitched the fronts to the back at the shoulders and attached the collar.
The pattern instructions are easy to follow for this, but if you get stuck you can always contact me.

This is where I do things a bit differently to the instructions. I find it easier to attach the sleeves now before sewing the side seams.
These tools are pointing to two sets of notches . The double ones always match up to the back of the garment, the single one to the front.
Mark these notches and do a gathering stitch between them.

Start to pin the sleeve to the garment using the gathers to gently ease the sleeve into place. Check to make sure that there are no pleats before machine stitching.

Then stitch the sleeve and the side seam in one and finish the seam edge. Don't forget to match the underarm seams perfectly

Stitch the sleeve bands together and check that they fit the sleeve.
Clip the point down to the seam line where the band folds to make it lie flat
Press the seam open and then press the band in half. Follow the pattern instructions again here

This is my sleeve band attached to my sleeve shown from the inside.

We need to stitch the hems and side and to do this we need some sort of measuring tool. This is where your own preference comes in. This is my selection
You will find all sorts of measuring tools and other fascinating things on this link Measuring Tool

There are also these Ironing rulers , they do come in useful.

This is my favourite measuring guage, but unfortunately it does not get along with the iron and I keep melting them .
You need to press the hems up and then fold the top inside, press again and top stitch.

Match the side seams and with the hem even mark the spot on the centre front where the popper will go.

I love these poppers (snaps) I have a box of them Box of snaps but you can purchase small packets instead in lots of colours if you don't want a whole box of them Snaps
I use them for lots of things, including bag making.
You also need a tool to attach them with Vario-pliers you will quite honestly find lots of uses for these


There is another newer blog showing you how to make the pants and top. The link is below.
I am a keen not to influence you too much on how to wear this garment , yes I have worn mine out and I loved it.
Sewing is a personal thing, we are not producing clones of what someone else has made - we are individuals with our own tastes and preferences, patterns do not have to be slavishly adhered to.( However having said that please take note of the suggested fabrics - they are there for a reason.)

I would love to see your jacket, the fabrics you used, and how you styled it.


I am really delighted with this lounge wear collection , I particularly love the way in which three different fabrics blend together so perfectly. This is best achieved by using fabrics from the same range, these fabrics are in fact from Jaycotts! But they are only available in store not online.
Chester is well worth a visit though.

The pattern is Kwik-Sew K4250
The fabrics I used are as I said available in store only at Jaycotts.
If you wish to purchase a collection of Fabrics which go together may I suggest these alternatives?
Quilting fabrics please remember to purchase fabrics by the same brand and to purchase by the metre.
If you prefer a dress cotton then there is endless choice , for example a cotton lawn would be perfect Cotton Lawn

I like to do the preparation first and one thing I like to do is to make my own bias binding if it is needed. It is nicer than shop bought and as you are usually using leftover bits of fabric it is free!
This is a very short clip showing what the bias of the fabric is . If it doesn't open , the link is What is the bias of your fabric

Once you have cut your bias strips to the width required. Join them together to make one long strip. Press it flat and press the seams open .

These are my bias srips waiting to be joined together.

I recommend one of these sets of tools Bias binding maker
Choose the size you need and cut your bias strip to a point at one end. Using a pin or an awl thread it through the bias binding maker.
Securely pin the pointed end to your ironing board and pull the tool away from the end being ready with an iron to press it as it emerges.
It's as simple as that!
Yes I know my ironing board cover needs replacing, I get through lots of them!

I like to wind my new binding around a piece of card to keep it neat.
The pattern pieces for the top need to be cut on the bias so follow the same instructions IE fold the width to the selvedge to find your bias, mark it and pin your fabric with the grainline along the bias line.
This will give your garment plenty of give. Please note that the two bias pieces are cut out singly.

Looking at the instructions for Top B follow steps 1 and 2 to make the front bands.

At the end of step 2 you will have this.

Steps 3 and 4 describe how to gather the bottom edge of the upper front and how to stitch them together

And the instructions proceed to tell us how to attach the band and how to attach the
Lower front to the upper front.

The shoulder seams need stitching next and a bias edging has to be applied to the back neckline.
Step 7 explains how, but do ask me if you want me to explain more.

The instructions tell us to stitch the side seams next but I found it easier to attach the bias binding to the armholes before doing that.
Your binding needs to curve around some very curved edges so once you have started sewing really stretch the binding around the curves.

Then once it has been stitched down the binding will lie flat . It's a good idea to practice this if you have never applied bias binding to a curve before. Sometimes it is easier to learn a process by actually doing it rather than me just telling you. This is also why it is important for you to be able to read a pattern.


I didn't follow the pattern instructions at all, so it is up to you if you want to try my method or stick to the pattern.
What follows are my instructions.
Join the fronts and the backs together and mark which is the front and which is the back.
Also mark the fold on the waist

Tidy the seams ,then join front to back at the sides and then in one long seam starting at the bottom of one inside leg and ending at the other, matching the front seam intersection.

Measure a piece of 3/4" elastic around your waist without stretching it, add a couple of inches and cut the length required.

Make a narrow hem along the top of the pants and press. Fold over towards the inside along the fold line as stitch close to the edge leaving a gap at the centre back to thread the elastic through.

Thread the elastic through the casing using a safety pin.
Pin the edges of the elastic together and try on, adjusting the elastic as necessary. You don't want it too snug or too loose.
When you are happy join the elastic securely and cut off any excess.
Close the gap by machine stitching.
Redistribute the fabric evenly along the elastic and stitch-in-the-ditch along the seam lines to stop the elastic from curling up when being worn.
Finish the trouser legs in the same way as the top.

If you have some bias binding left over a nice touch is to press and stitch it in half and attach it to the centre front. This also helps you to know which way to put them on!

I used an assortment of fabrics but all on one theme so they work together very well.

Any of these pieces could be made in different fabrics for beach and holiday wear.

I love the jacket and I have worn it with white Palazzo pants and it looked fab.

The sleeves are amazing don't you think?
The thing I like best about them is that they are cut very cleverly and they don't get in the way at all.
It is a fantastic pattern, great for any level of sewing ability and would look good on anyone.


We are going to start by making the jacket. The pants and top will follow in another blog post. I didn't want to put you off by doing too much all in one go!
In the next post I will show you how I styled all of my garments and there will be photographs.
These are the fabrics I chose to use for the jacket. We are always told never to mix prints but never be afraid to bend the rules , these two prints actually sit very well together.

The biggest mistake everyone makes is when choosing which size to cut out. Do not ever just cut out your dress size as it will not correspond to your pattern size. Most likely your pattern size will be one or two or more sizes larger than your ready to wear size. This is normal.
Check your bust waist and hip measurements and write them down. Then study the back of the pattern and see which measurements most closely resemble your own.

Patterns have " wearing ease" included. This simply shows you what sort of fit it is, for example it could fit close to the body or it could be loose fitting. You will probably have to hunt around for this measurement, in this case the "Actual size" measurements are found printed on the pattern pieces.
Use both of these measurements to decide which size would be best for you. You may of course combine sizes for the top and bottom.
If in doubt go up to the next size as it is easy to take garments in, but not so easy to make them larger.
Before starting, wash dry and press your fabric as they often shrink in the first wash.

You will need various tools
A new sewing machine needle Universal sewing machine needles A medium size 12 will be fine for sewing cotton fabric
Some good quality sewing thread to match your fabric Gutterman sew all thread
Tacking thread Gutterman Tacking thread
Pins and a pin cushion, I like this one, but there are more options Magnetic pin cushion and pins
Tape measure - a traditional one or retractable one is fine Tape measure

You will also need a selection of scissors. This is where there is so much choice
To start with you need
a pair of good quality dressmaking scissors. These can be soft grip or traditional .
A pair of needlework or embroidery scissors for cutting thread etc
A pair of general scissors to be used solely for cutting paper.
Never ever use your dressmaking scissors for cutting paper, not even cutting out your pattern. Keep an older or cheaper pair for this purpose.
If you are choosing FISKARS scissors then they have a scissor sharpener which works very well with their products FISKARS scissors sharpener

Once you have decided on your size cut the pattern pieces out and have a look at them to see how many of each you need and identify any which need to go on the fold line of the fabric.
There is a pattern layout guide on the first page of the pattern instructions which I suggest you follow.

In addition to making sure that the pattern pieces are the right way up they must also be on the grain of the fabric. You will see a line with an arrow at each end printed on each pattern piece. This line needs to be exactly the same distance from the selvedge of the fabric all the way along. Use your tape measure and pin your pattern to the fabric once you know it is straight.
Don't try to save fabric by skipping this step. If your fabric is not straight the garment will not hang straight either.

A tip is to put all your tissue paper and fabric scraps into a bin until you have finished your garment - it is so easy to throw a pattern piece out by mistake and you may need a fabric scrap.

I always keep larger pieces of left over fabric for other projects. Patchwork etc.

We need some way of transferring pattern markings onto fabric. My preferred way is with tailors tacks.
You will see various dots which need to be marked onto your fabric, or there may be darts
To mark the position with tailors tacks stitch on the spot a couple of times with tacking thread leaving long loops on the top.

Then simply ease the fabric apart and cut the thread in the centre leaving tufts of thread on each piece.
There are other methods including using marker pens but this is my preferred way as the fabric is in no risk of being damaged.

I am using my overlocker to finish my seams but other methods are described above.

An early part of the jacket instructions is to attach iron on interfacing to one set of collar pieces. This is to stiffen the fabric slightly and make it lie flat. Always use a good quality interfacing such as Vilene iron on interfacing there are cheaper brands but quite honestly why spoil your work with inferior products?
Be careful with your iron temperature when using iron on interfacing, use a pressing cloth as it can easily melt!
Hint! Press each seam as you sew it to blend the stitches into the fabric for a professional finish

I have made up the collar , stitched the fronts to the back at the shoulders and attached the collar.
The pattern instructions are easy to follow for this, but if you get stuck you can always contact me.

This is where I do things a bit differently to the instructions. I find it easier to attach the sleeves now before sewing the side seams.
These tools are pointing to two sets of notches . The double ones always match up to the back of the garment, the single one to the front.
Mark these notches and do a gathering stitch between them.

Start to pin the sleeve to the garment using the gathers to gently ease the sleeve into place. Check to make sure that there are no pleats before machine stitching.

Then stitch the sleeve and the side seam in one and finish the seam edge. Don't forget to match the underarm seams perfectly

Stitch the sleeve bands together and check that they fit the sleeve.
Clip the point down to the seam line where the band folds to make it lie flat
Press the seam open and then press the band in half. Follow the pattern instructions again here

This is my sleeve band attached to my sleeve shown from the inside.

We need to stitch the hems and side and to do this we need some sort of measuring tool. This is where your own preference comes in. This is my selection
You will find all sorts of measuring tools and other fascinating things on this link Measuring Tool

There are also these Ironing rulers , they do come in useful.

This is my favourite measuring guage, but unfortunately it does not get along with the iron and I keep melting them .
You need to press the hems up and then fold the top inside, press again and top stitch.

Match the side seams and with the hem even mark the spot on the centre front where the popper will go.

I love these poppers (snaps) I have a box of them Box of snaps but you can purchase small packets instead in lots of colours if you don't want a whole box of them Snaps
I use them for lots of things, including bag making.
You also need a tool to attach them with Vario-pliers you will quite honestly find lots of uses for these

The belt is simple to sew. The instructions suggest making thread loops but I made fabric loops very simply by taking a long piece of fabric, turning the ends in and then folding it in half and top-stitching - just like the belt holders on your jeans

This is the back of my lovely little jacket.

There is another newer blog showing you how to make the pants and top. The link is below.
I am a keen not to influence you too much on how to wear this garment , yes I have worn mine out and I loved it.
Sewing is a personal thing, we are not producing clones of what someone else has made - we are individuals with our own tastes and preferences, patterns do not have to be slavishly adhered to.( However having said that please take note of the suggested fabrics - they are there for a reason.)

I would love to see your jacket, the fabrics you used, and how you styled it.

The pants and top
In this post we will continue to use the same pattern and make the other two garments, the pants and top.

I am really delighted with this lounge wear collection , I particularly love the way in which three different fabrics blend together so perfectly. This is best achieved by using fabrics from the same range, these fabrics are in fact from Jaycotts! But they are only available in store not online.
Chester is well worth a visit though.

The pattern is Kwik-Sew K4250
The fabrics I used are as I said available in store only at Jaycotts.
If you wish to purchase a collection of Fabrics which go together may I suggest these alternatives?
Quilting fabrics please remember to purchase fabrics by the same brand and to purchase by the metre.
If you prefer a dress cotton then there is endless choice , for example a cotton lawn would be perfect Cotton Lawn

I like to do the preparation first and one thing I like to do is to make my own bias binding if it is needed. It is nicer than shop bought and as you are usually using leftover bits of fabric it is free!
This is a very short clip showing what the bias of the fabric is . If it doesn't open , the link is What is the bias of your fabric

Once you have cut your bias strips to the width required. Join them together to make one long strip. Press it flat and press the seams open .

These are my bias srips waiting to be joined together.

I recommend one of these sets of tools Bias binding maker
Choose the size you need and cut your bias strip to a point at one end. Using a pin or an awl thread it through the bias binding maker.
Securely pin the pointed end to your ironing board and pull the tool away from the end being ready with an iron to press it as it emerges.
It's as simple as that!
Yes I know my ironing board cover needs replacing, I get through lots of them!

I like to wind my new binding around a piece of card to keep it neat.

The pattern pieces for the top need to be cut on the bias so follow the same instructions IE fold the width to the selvedge to find your bias, mark it and pin your fabric with the grainline along the bias line.
This will give your garment plenty of give. Please note that the two bias pieces are cut out singly.

Looking at the instructions for Top B follow steps 1 and 2 to make the front bands.

At the end of step 2 you will have this.

Steps 3 and 4 describe how to gather the bottom edge of the upper front and how to stitch them together

And the instructions proceed to tell us how to attach the band and how to attach the
Lower front to the upper front.

The shoulder seams need stitching next and a bias edging has to be applied to the back neckline.
Step 7 explains how, but do ask me if you want me to explain more.

The instructions tell us to stitch the side seams next but I found it easier to attach the bias binding to the armholes before doing that.
Your binding needs to curve around some very curved edges so once you have started sewing really stretch the binding around the curves.

Then once it has been stitched down the binding will lie flat . It's a good idea to practice this if you have never applied bias binding to a curve before. Sometimes it is easier to learn a process by actually doing it rather than me just telling you. This is also why it is important for you to be able to read a pattern.

That's the top finished apart from the hem which I used my overedge foot on and then turned up and pressed before top -stitching.
The pants

I didn't follow the pattern instructions at all, so it is up to you if you want to try my method or stick to the pattern.
What follows are my instructions.
Join the fronts and the backs together and mark which is the front and which is the back.
Also mark the fold on the waist

Tidy the seams ,then join front to back at the sides and then in one long seam starting at the bottom of one inside leg and ending at the other, matching the front seam intersection.

Measure a piece of 3/4" elastic around your waist without stretching it, add a couple of inches and cut the length required.

Make a narrow hem along the top of the pants and press. Fold over towards the inside along the fold line as stitch close to the edge leaving a gap at the centre back to thread the elastic through.

Thread the elastic through the casing using a safety pin.
Pin the edges of the elastic together and try on, adjusting the elastic as necessary. You don't want it too snug or too loose.
When you are happy join the elastic securely and cut off any excess.
Close the gap by machine stitching.
Redistribute the fabric evenly along the elastic and stitch-in-the-ditch along the seam lines to stop the elastic from curling up when being worn.
Finish the trouser legs in the same way as the top.

If you have some bias binding left over a nice touch is to press and stitch it in half and attach it to the centre front. This also helps you to know which way to put them on!


Any of these pieces could be made in different fabrics for beach and holiday wear.

I love the jacket and I have worn it with white Palazzo pants and it looked fab.

The sleeves are amazing don't you think?
The thing I like best about them is that they are cut very cleverly and they don't get in the way at all.
It is a fantastic pattern, great for any level of sewing ability and would look good on anyone.

So, have you made these three garments yet? The link to the jacket post is at the top of this page.
All equipment is from Jaycotts.co.uk. visit the web site here Jaycotts web site
You can contact them by telephone on 01244 394099 9 -4 Monday to Friday
Or why not pay them a visit? Ring ahead first then they can have any machines etc that you want to try ready for you.
Contact details and directions are Visit Jaycotts here
Thank you for reading this
Sewangelicthreads